1. Documentation#
This week’s task was to document our process using GITLab and GitHub, which I have learned are not the same thing, and also learning how to set up our own web page, with all the challenges this involves.
This web page is meant to be a tutorial on how to do both of these things but with a slight personal touch since I will share the difficulties I found along the way and the solutions found. I hope this blog is useful to you and that you learn something along the way.
I think it is interesting to explain the reason we use GitLab and GitHub in the first place. It is a useful technology that allows for cooperation in group projects, saving past versions and allowing users to work on their part of the project individually from their server before sharing it with the group.
It is also a nice way to present a prototype in a clear way so that it is more likely to be realized. The mentality is to share things even if they are not perfectly finished in order to add value to the community.
Editing files from your local repository (using Git)#
Editing files from your own computer is best option when working on a project and it is as simple as following the following steps.
- Install and configure git 2. Set up an SSH key 3. Clone your workspace 4. Get a text editor and learn to write in markdown, and that is it! You may already have Git installed in your computer! you can check this with the following command: git—version
As you can see in the photo, if you have it installed it will show you the version you have, and if you don’t Terminal will say it doesn’t recognize that command.
Installing Git is easy, you’ll see!
Here is the link to Git’s website:
If you are using Windows, you will also have to download git Bash which serves as an intermediary between Git and you. However, if you are a Mac user, like myself, the Terminal in your computer already serves this purpose.
In order to open the Terminal press Command + Space, type Terminal, and hit Enter. Now you can type “brew install git” to install Git. Once this is done you can return to step number 1 in order to make sure Git is working for you
Setting up your SSH key#
Now it is time to set up the SHH key. But what is a SHH key? I had never heard this term before… An SSH key is a unique identifier that authenticates you and links your Gitlab or GitHub to your computer, it is very useful because, once you set it up, it will allow you to connect to the remote server without the need of a password. The SHH key has a public key, that is visible to everybody, and a private one, that is saved in your computer.
In order to find out if you have a key or not, type this into your terminal:
ls -al ~/.ssh
(ls is a command that lists the names of the of files inside a directory, you will use it a lot) Since you probably don’t have an SHH key, what you need to do is open the terminal and run the shh Keygen command. Copy the following :
ssh-keygen -t rsa -b 4096 -C “your_email@example.com”
-t rsa means the keys is RSA type and -b 4096 means key size is 4096 bits, which is highly secure. -C your_email@example.com Adds a label (your email) to identify the key. You can write anything else, they won’t send a confirmation email or anything but it is useful to name it that way.
In order to sabe the key Just press Enter to use the default location
(~/.ssh/id_rsa).
You may Set a Passphrase for added security if you wish to, but you can also press Enter to skip it. If you have been following the steps untill now you Will have generated two files in your ~/.ssh folder
id_rsa (private key) id_rsa.pub (public key)
Cloning the workspace#
Cloning your workspace means downloading all the files and documents that this Fablab course provides us with from GitLab and saving them in your computer. In order to do so
Search Fablab ULB and follow the digital path shown in the picture above until you reach “students”. Then find your name in the list and you’ll see the documents and student templates provided for you that you will now try to clone onto your computer.
All you need to do is copy the link below “clone with shh” and paste it onto your Terminal using the following the git clone command
In my case, it looks something like this Git clone git@gitlab.com:fablab-ulb/enseignements/2024-2025/fabzero-experiments/students/paula.zamorano.git
Using markdown and text editor Visual Studio Code#
Markdown, as I have learnt, is a language for formatting text, it uses simple symbols (such as # for headings or * for bullet points) to apply formatting hence why it has become commonly used for blogs and README files. Visual Studio Code (VS code) on the other hand is a powerful text editor developed by Microsoft that can handle many languages, including Markdown. You may also use other text editors, like atom for example, but VS code is what I used and it works quite well. Here is the link to the VS website so you can download it: https://code.visualstudio.com/ Here are a few Markdown commands you can practice with:
- Headings: Use # for headings (e.g., # Heading 1).
- Bold/Italics: Use bold or italic.
- Lists: Unordered: - Item, Ordered: 1. First.
- Links/Images: Link or
.
- Code: Inline:
code, Block:code.
Our task was to edit the index.md file. I edited it in visual code and then it was time to upload it to the online git server. This part was very tricky for me so i will explain the mistakes i made so that you don’t repeat them.
- Open Terminal and navigate to your project folder: To do so use the cd command, that directs you to different folders
cd /path/to/your/repo
- Pull the latest changes from GitLab to ensure your local repo is up to date:
git pull origin main
- Add your file to the staging area:
git add yourfile.txt
The git add prepares your changes before saving them with a commit. In order to make sure I saved all files in my current directory, I used
git add . , which has proved to be a useful shortcut.
- Commit your changes with a message:
git commit -m "Here you describe the changes you did"
This is useful if you want to return to previous versions of your work or if you wish to see the evolution of it. It will be a lifesaver if at some point something in your code goes wrong. 5. Push your changes to GitLab:
git push origin main
This command uploads your changes to the online repository (origin) “main” is the name of the default branch in which they are saved.
Short n’ sweet#
Just like Sabrina carpenter, we don’t want our web page to be too heavy and difficult to load. Hence why reducing the weight and compressing photos and videos has become a necessity. Here are a few things our teachers have taught us about the images we should include in our website.
SVGs are scalar vector graphics and are great for logos and icons since they provide with resolution in a lightweight format. The app I am using for this is Inkscape, further on in my blog I will make a tutorial on how to use it.
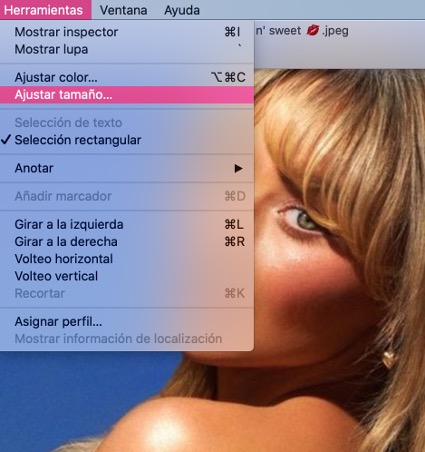
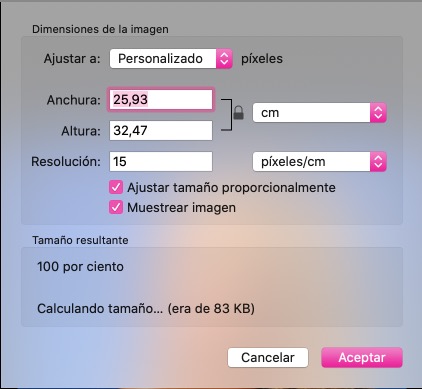
JPEGs is a nice format for the photos in our website but me must remember to compress the image by lowering the number of pixels per unit area and adjusting the dimensions. Finally, I will show you how I made a photo of Sabrina Carpenter go from 60 Gb to 50 Gb. I used the photo editor application on my Mac.
These images show the method i have been using to keep my documentation light or how Sabrina Carpenter would call it “Short and Sweet”

I have a Mac computer, so what I do is go to “Tools” (Herramientas) and adjust the size (Ajustar tamaño)
I usually divide the number of pixels per unit area by 2 and work with that
Make Sabrina Carpenter Happy and keep your Documentation Short n’ Sweet ;)
Proyect management#
Some project management techniques our teachers showed us are: - divide a big task into small ones, and put a maximum time limit - Be up to date with the documentation so that we don’t forget what we did weeks prior - Academic honesty: Give credit to the resources that helped our work and include links to all our files. - The objective should be that someone without specific knowledge can replicate your work